Tomato Relish Recipe (Kiwi-Style with a Twist)
Every summer, when our tomato plants explode with ripe, juicy goodness, I know exactly what I’m making first: this best-ever tomato relish recipe. It’s one of those simple homemade gems that never fails me—whether I’m spooning it onto a hot sausage at a BBQ, layering it into a toastie, or gifting jars to friends at Christmas.
I first learned how to make tomato relish in my tiny kitchen in Wellington. I had no food processor, no fancy ingredients—just a pot, a spoon, and way too many tomatoes. Fast forward a few years, and this recipe has become a family favourite. It’s sweet, tangy, and just the right amount of rustic. And the best part? It only takes 5 easy steps to go from fresh tomatoes to flavour-packed jars ready for the pantry.
In this post, I’ll walk you through exactly how I make my Kiwi-style tomato relish, share a few personal tips, and even sprinkle in a little fun history and nutrition for good measure. Let’s get started—your burgers will thank you!
A Little Tomato Relish History (and Why I Love It)
Before I ever made a single jar, I always thought tomato relish was one of those magical things that only grandmas knew how to make. You know—lined up in tidy jars in a cool pantry, each one perfectly sealed and labelled in neat handwriting.
But as it turns out, tomato relish isn’t just delicious—it has a pretty cool backstory too.
Where It All Began
Tomato relish as we know it today has roots in British and European preserving traditions. Back when fridges weren’t a thing, people had to get clever about saving the summer harvest. Enter: preserving. Tomatoes were boiled down with vinegar and sugar to make them shelf-stable through the colder months.
When settlers brought those preserving habits to Australia and New Zealand, they adapted them with local ingredients and seasonal produce—and tomato relish took off. It became a staple in Kiwi and Aussie households, especially during the 1930s to 1950s when home preserving was essential.
A Classic Kiwi Combo
Ask any Kiwi kid from the ’70s or ’80s, and they’ll probably remember tomato relish served with corned beef and mashed potatoes, or spread thickly on a ham sandwich for school lunch. That mix of sweet, tangy, and savoury is something a lot of us grew up with—and now we’re making it for our own families.
For me, it’s more than a recipe. It’s a way to honour that old-school, make-it-yourself spirit. It’s frugal, practical, and full of flavor. Plus, there’s something pretty special about popping the lid on a jar of relish you made months ago, tasting summer all over again.
I love cooking recipes that bring people together. Whether it’s this tomato relish or something bold and spicy like this fiery Korean rice cake dish, there’s just something about homemade flavours that feel like home.
What You’ll Need to Make This Tomato Relish
This tomato relish recipe is beautifully simple. You don’t need anything fancy—just a handful of pantry staples, some ripe tomatoes, and a bit of patience. I’ve listed the exact ingredients I use below, but feel free to tweak things depending on what you have on hand.
Ingredients (Makes about 4–5 medium jars):
- 1.5 kg ripe tomatoes, chopped (Roma or vine-ripened work best)
- 500 g brown onions, finely chopped
(In my case, I didn’t have brown onions on hand—so I used red onions instead, and it still turned out delicious. Use what you’ve got!) - 1 ½ cups white or malt vinegar
- 1 cup brown sugar (for that rich caramel depth)
(I was in a bit of a rush and realised I was out of brown sugar, so I swapped in white sugar. The flavour was still lovely—just a touch less deep.) - 2 tsp salt
- 1–2 garlic cloves, minced (optional, but I always include it)
- 1 tsp mustard seeds (optional but lovely)
- ½ tsp chili flakes (optional, for a hint of warmth)
Tomato Relish Ingredients: Metric vs Imperial
| Ingredient | Metric Amount | Imperial Amount |
|---|---|---|
| Ripe tomatoes | 1.5 kg | 3.3 lbs (~7 cups chopped) |
| Brown onions | 500 g | 1.1 lbs (~3 cups chopped) |
| Vinegar (white/malt) | 375 ml | 1.5 cups |
| Brown sugar | 200 g | 1 cup |
| Salt | 2 tsp | 2 tsp |
| Garlic (optional) | 1–2 cloves | 1–2 cloves |
| Mustard seeds | 1 tsp | 1 tsp |
| Chili flakes | ½ tsp | ½ tsp |
These quantities make a decent batch—enough to share or stash away. If you’re just testing it out for the first time, feel free to halve the recipe.
How I Make This Tomato Relish – Step-by-Step
This part is where the magic happens. Making relish feels a bit like an old-school kitchen ritual—slow, fragrant, and deeply satisfying. Here’s exactly how I make mine, with all the little tips I’ve picked up over the years.
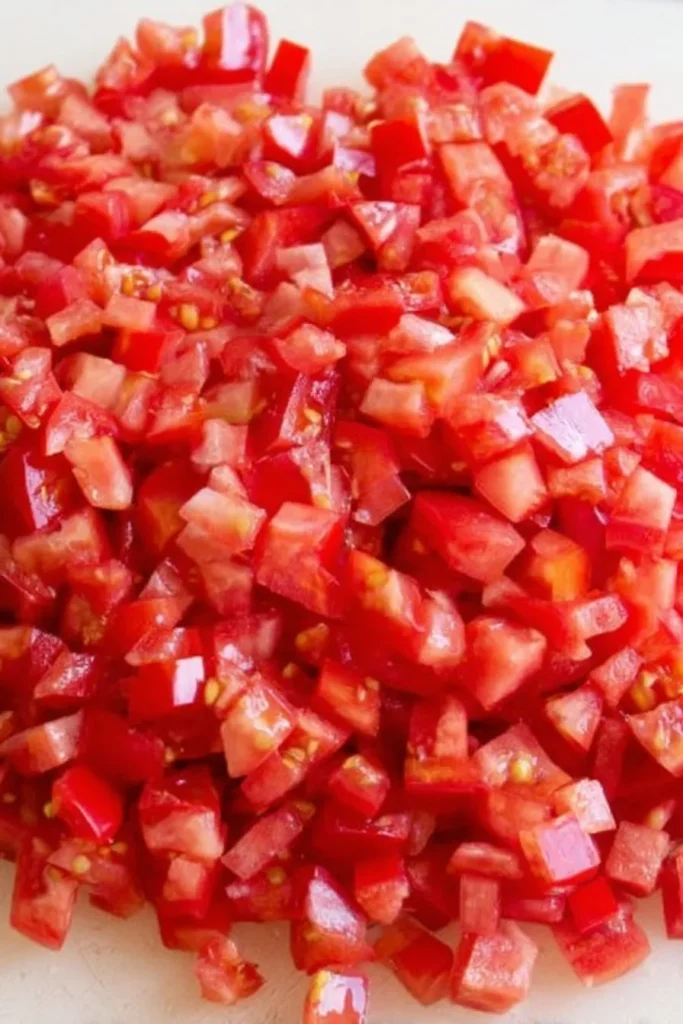
1. Prep Your Tomatoes and Onions
I start by chopping the tomatoes into small pieces. If I have time, I’ll blanch and peel them for a smoother finish—but honestly, I often leave the skins on, and it still turns out beautifully.
I finely dice the onions too. The trick is to chop them small enough so they almost melt into the relish later.
💡 Tip: If you’re using super juicy tomatoes, strain off some liquid before cooking to speed up the reducing process.
2. Start the Base
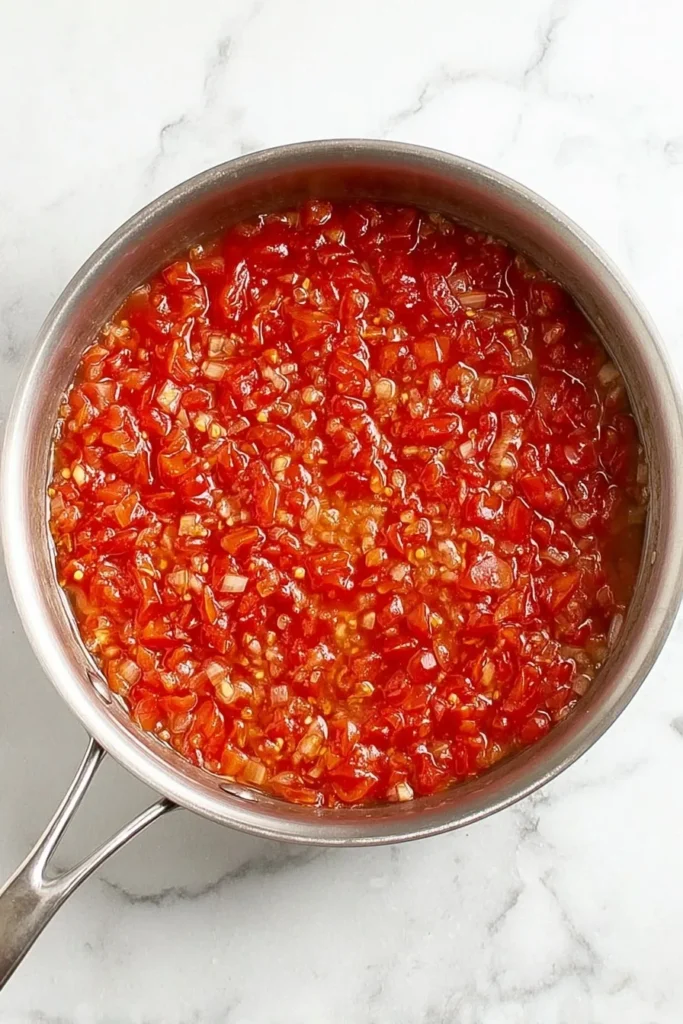
In a large, heavy-bottomed pot, I combine the chopped tomatoes, onions, and salt. I bring it all to a gentle simmer over medium heat and let it cook for about 20 minutes. The tomatoes should start breaking down, and the onions go lovely and soft.
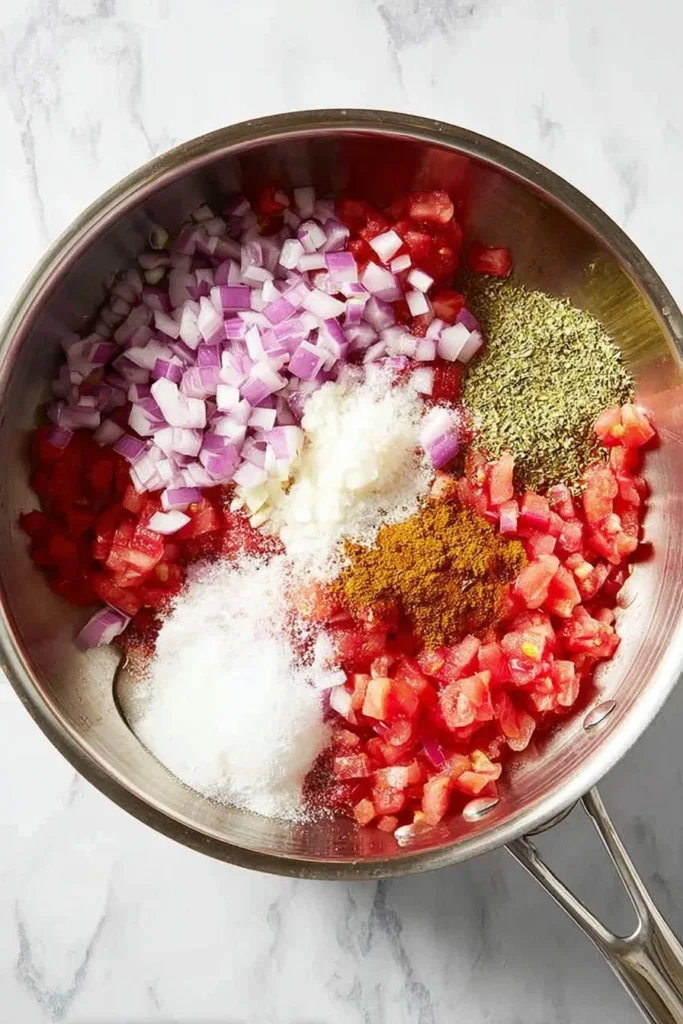
3. Add Sugar, Vinegar & Extras
Next, I stir in the brown sugar and vinegar. This is when that signature tomato relish smell fills the kitchen—sweet, tangy, and comforting.
At this point, I also add garlic, mustard seeds, and chili flakes if I’m using them. Sometimes I toss in a bit of cracked pepper too. Stir everything well to combine.
💡 Tip: Use a wooden spoon—metal can react with vinegar and affect the taste.
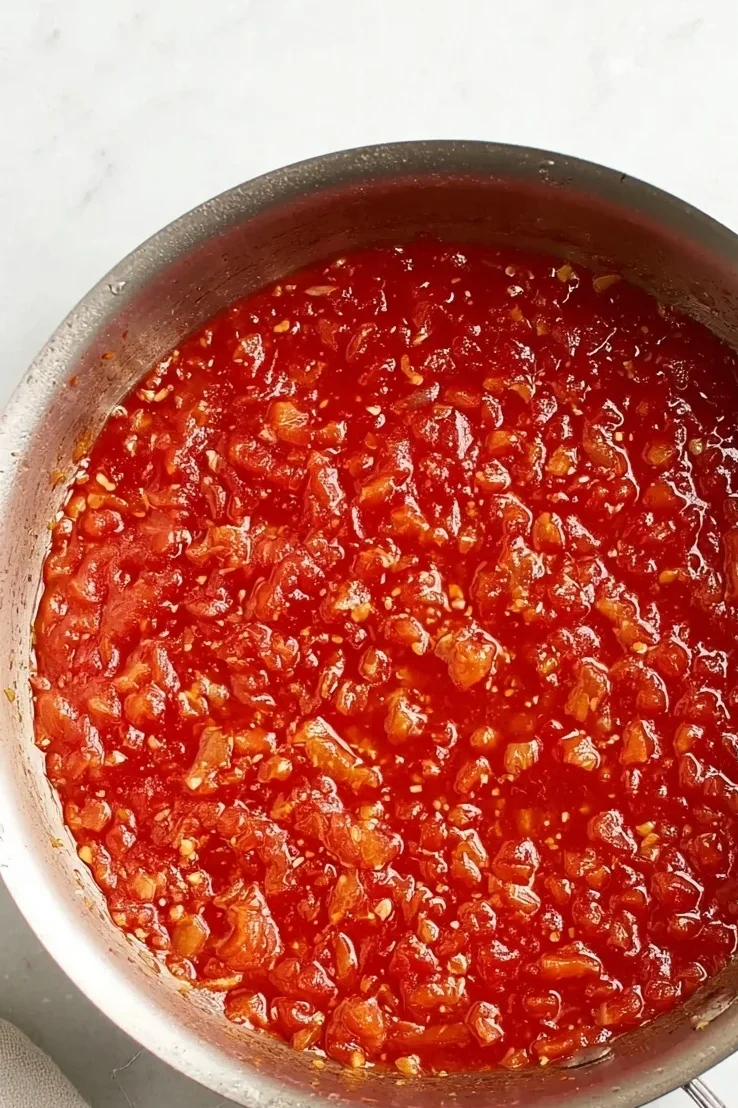
4. Reduce It Down
Now the waiting begins. I keep the pot simmering uncovered for 30 to 45 minutes, stirring every 5 to 10 minutes so nothing sticks to the bottom. You’ll know it’s ready when it’s thick, glossy, and reduced by nearly half.
It should coat the back of a spoon like jam—rich and spoonable, but not runny.
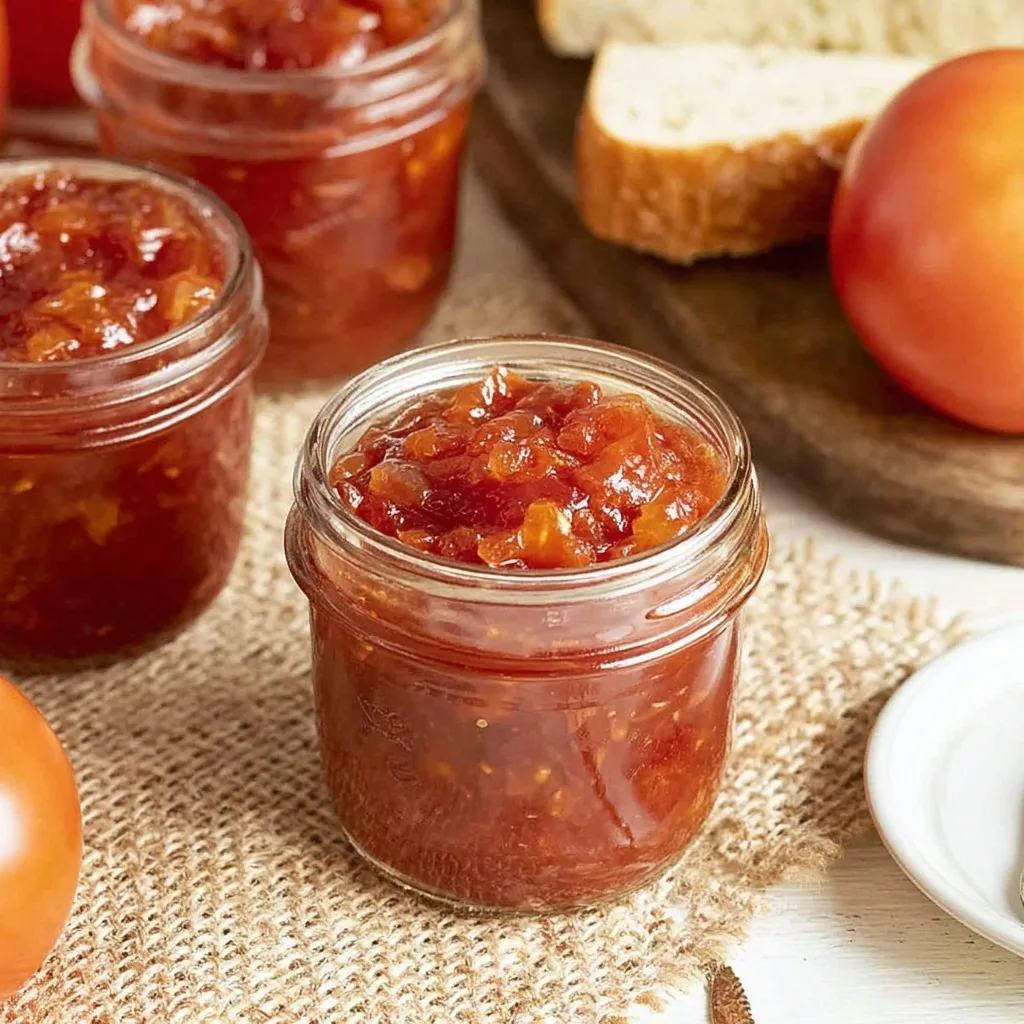
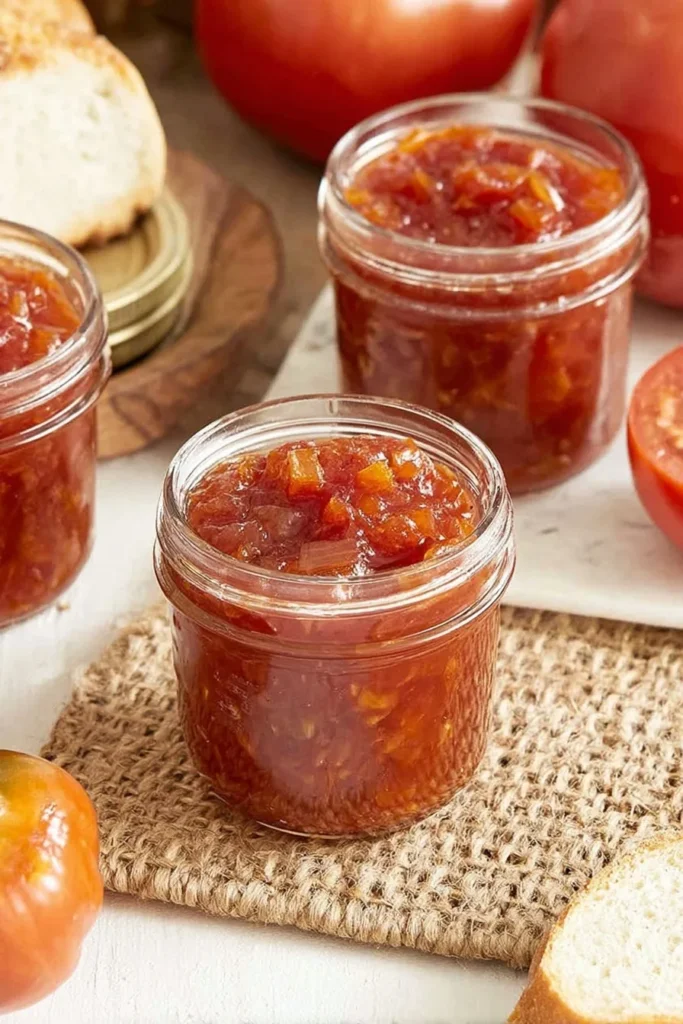
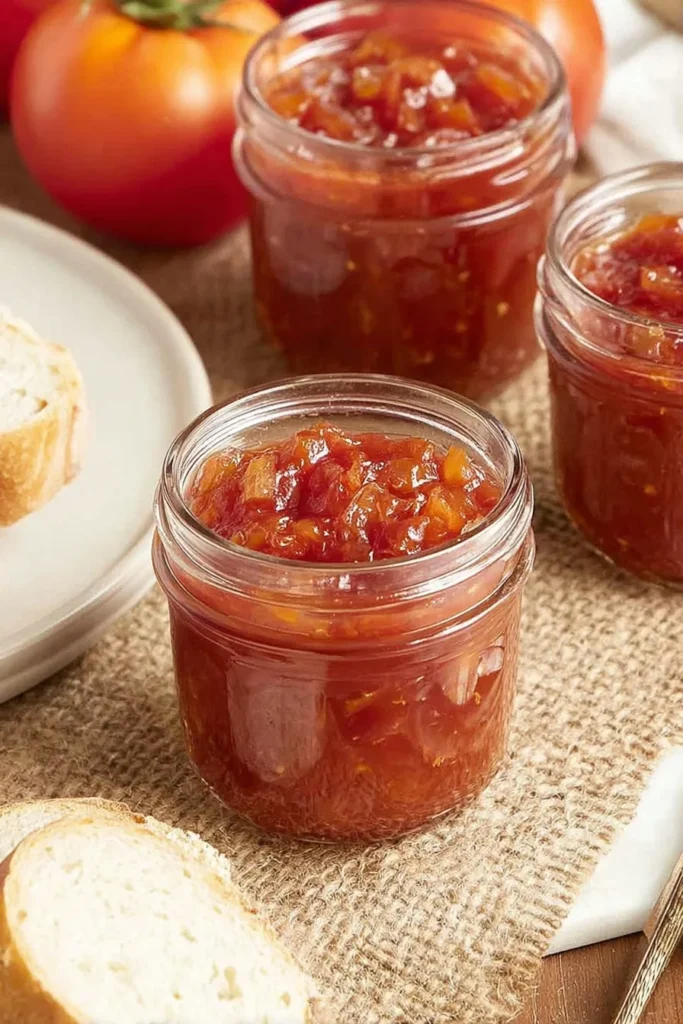
5. Bottle It Up
While the relish is finishing, I sterilise my jars (hot soapy wash + 10 mins in a 120°C oven). Then I ladle the hot relish straight into the hot jars, wipe the rims, and seal them while they’re still warm.
💡 Tip: Label with the date. It’s easy to forget when you made it if you’ve got a growing relish stash like mine!

How I Use This Tomato Relish (On Everything!)
This tomato relish isn’t just for one thing—it’s the kind of condiment that works with just about everything. Honestly, once you’ve got a jar in the fridge, you’ll start finding excuses to put it on anything.
Here are a few of my favorite ways to enjoy it:
- With burgers and snags – I never serve grilled sausages without a dollop of this on the side. It’s BBQ gold.
- In toasties – Ham, cheese, and tomato relish? Heaven. Especially on sourdough.
- On a cheese board – I add a little ramekin of relish alongside vintage cheddar and crackers. It pairs beautifully with my dairy-free nut-based spread.
- With roast meats – Lamb, pork, even cold chicken—this relish brings a sweet tang that cuts through the richness beautifully.
- As a sandwich spread – Move over mayo. I love it layered with turkey or leftover roast beef.
- As a dip at parties – It’s surprisingly good with veggie sticks or a smooth, dairy-free ranch alternative.
And truthfully? I’ve eaten it straight off the spoon more than once. (No judgment if you do too.)
How I Store Tomato Relish (So It Lasts for Months)
One of the best things about this tomato relish recipe? It keeps really well—so you can enjoy a taste of summer long after the tomatoes are gone.
Here’s how I store it:
Pantry Storage (Unopened Jars)
Once I spoon the hot relish into sterilised jars and seal them, I let them cool at room temperature and then store them in a cool, dark pantry. As long as the jars are properly sealed, they’ll keep beautifully for up to 12 months.
💡 Tip: I always label mine with the date and batch size—it helps when I make multiple batches in a season.
Fridge Storage (After Opening)
Once opened, the jar goes straight into the fridge. I try to use it within 2 to 3 weeks, but let’s be honest—it rarely lasts that long in our house.
Can You Freeze It?
Yes, you can! If I’ve got more than I can jar at once, I sometimes freeze a portion in airtight containers. Just make sure it’s completely cooled before freezing, and leave room in the container for expansion. It’ll last up to 6 months frozen.
Whether you’re gifting it, preserving it for winter, or just keeping it on hand for weekday lunches—this relish is a keeper (literally).
Is Tomato Relish Healthy? (Here’s the Nutritional Lowdown)
Okay, so let’s talk nutrition. While this tomato relish isn’t exactly a green smoothie, it’s far better than most store-bought versions—and you know exactly what’s going into it.
Here’s a rough estimate of the nutrition per tablespoon (15g) of my homemade tomato relish:
| Nutrient | Approx. Amount |
|---|---|
| Calories | ~25 kcal |
| Carbohydrates | ~6g |
| Sugars | ~4.5g |
| Fat | 0g |
| Protein | 0.3g |
| Sodium | ~80mg |
📌 Note: These values can vary slightly depending on how much sugar and vinegar you use—or any add-ins like chili or fruit.
For comparison, a store-bought tomato relish typically contains higher sodium and added preservatives. According to FatSecret NZ’s database, commercial tomato relish averages about 30–35 calories and more than 120mg of sodium per tablespoon—sometimes more, depending on the brand.
My Take On It:
Compared to supermarket versions, this homemade tomato relish is lighter on salt, free from artificial stuff, and made with ingredients you actually recognize. You can even cut back the sugar or swap in natural sweeteners like honey or stevia if you’d like to make it even healthier.
When used as a condiment (and not eaten straight from the jar—guilty), it adds bold flavor without ruining your balance. And hey, if it helps you skip processed sauces or eat more grilled veggies, I say that’s a win.
Tomato Relish vs. Chutney – What’s the Difference?
If you’ve ever stood in front of the condiments shelf wondering “Wait… is chutney the same as relish?” — you’re definitely not alone. I used to think they were interchangeable too, but after years of making both, I’ve come to appreciate their subtle (and tasty) differences.
Here’s how I like to explain it:
| Feature | Tomato Relish | Tomato Chutney |
|---|---|---|
| Texture | Chunky, slightly loose | Thicker, smoother (more like jam) |
| Flavor profile | Tangy, mildly sweet | Sweet-spicy, more complex spice blend |
| Common use | Sandwiches, BBQs, burgers | Cheese boards, curries, rice dishes |
| Add-ins | Garlic, mustard seeds, chili (optional) | Ginger, cloves, cinnamon, dried fruits |
| Cooking time | Shorter (30–45 mins) | Longer (can simmer over an hour) |
Which One Should You Make?
If you’re after something quick and easy with a bold tomato flavor—go with relish. It’s lighter, less spiced, and pairs beautifully with anything savoury. I make chutney too (especially when I have green tomatoes or apples lying around), but relish is my everyday go-to.
💬 Pro tip: In a pinch, you can use chutney in place of relish, but expect a sweeter, heavier result.
My Tried-and-True Tips for Perfect Tomato Relish
Over the years, I’ve made more batches of tomato relish than I can count—some turned out incredible, and a few… well, let’s just say I’ve learned a few things the hard way. 😅
If it’s your first time making relish, these tips will help you avoid the rookie mistakes and nail it from the get-go:
1. Use ripe, meaty tomatoes
Roma or heirloom varieties are ideal because they’re less watery and full of flavour. If your tomatoes are too juicy, you’ll be simmering forever to get that nice thick texture.
2. Don’t rush the reduction
Letting the relish slowly bubble down is what gives it that rich, sticky goodness. If it looks too watery, keep going! Patience pays off.
3. Stir often
Seriously—this stuff loves to stick to the bottom of the pot once the sugar goes in. I set a timer to remind myself to stir every 5–10 minutes once it starts thickening.
4. Sterilise your jars properly
A quick wash isn’t enough if you want the jars to keep for months. I run mine through the dishwasher or place clean jars in a 120°C oven for 10 minutes before filling.
5. Let it rest before digging in
The flavours mellow and deepen after a few days. It’s so tempting to crack a jar open right away (I’ve done it plenty), but if you can wait 2–3 days, the difference is worth it.
Making tomato relish is part recipe, part rhythm—and once you get the hang of it, it feels like second nature.
Frequently Asked Questions About Tomato Relish
I’ve had so many friends and readers ask me questions over the years, especially when they’re making relish for the first time. Here are some of the most common ones—with my honest, kitchen-tested answers.
Can I make this tomato relish without sugar?
You can! But keep in mind that sugar not only sweetens—it helps with preservation and texture too. I’ve used honey or even stevia as a lower-sugar option. Just expect a slightly different consistency.
What kind of tomatoes are best?
Go for ripe, meaty tomatoes like Roma or heirloom varieties. They have fewer seeds and less water, which means more flavour and less cooking time.
How long does homemade tomato relish last?
If sealed properly in sterilised jars, it can last up to 12 months in a cool pantry. Once opened, store it in the fridge and use within 2–3 weeks.
Can I freeze tomato relish?
Absolutely! Let it cool completely, then freeze it in airtight containers. It’ll keep for about 6 months. Just thaw in the fridge overnight before using.
Why is my relish too runny?
It probably needs more time to reduce. Keep simmering (uncovered) until it thickens. Remember: it should coat the back of a spoon and look glossy when done.
Is tomato relish the same as ketchup?
Nope! Ketchup is usually smooth, sweeter, and made with a lot more sugar and spices. Relish is chunkier, tangier, and more rustic.
Can I double the recipe?
Yes, and I often do! Just make sure you use a big enough pot and allow extra time for simmering—it takes longer for larger batches to reduce properly.
If you’ve got other questions, feel free to drop them in the comments—or tag me on Pinterest if you try this recipe. I love seeing your jars in action!
Recipe
Best-Ever Tomato Relish Recipe (Kiwi-Style)

This homemade tomato relish recipe is sweet, tangy, and packed with flavour—perfect for burgers, cheese platters, and roast meats. Made with ripe tomatoes and pantry staples, it’s a Kiwi classic in 5 easy steps!
Ingredients
- 1.5 kg ripe tomatoes, chopped
- 500 g brown onions, finely chopped
- 1 ½ cups white or malt vinegar
- 1 cup brown sugar
- 2 tsp salt
- 1–2 garlic cloves, minced (optional)
- 1 tsp mustard seeds (optional)
- ½ tsp chili flakes (optional)
Instructions
- Chop and Prep
Dice the tomatoes and onions. For a smoother texture, blanch and peel the tomatoes—though this step is optional. - Start the Base
In a large saucepan, combine tomatoes, onions, and salt. Bring to a simmer over medium heat and cook for 20 minutes until soft. - Add Sugar and Vinegar
Stir in brown sugar and vinegar. Add garlic, mustard seeds, and chili flakes if using. Stir to combine. - Simmer and Reduce
Simmer uncovered for 30–45 minutes, stirring often, until the mixture thickens and becomes glossy. It should coat the back of a spoon. - Bottle and Store
While the relish is hot, spoon into sterilised jars. Seal immediately and allow to cool. Store unopened jars in a cool, dark place.
Notes
- Use Roma or heirloom tomatoes for best flavour and texture.
- For a sugar-free version, try using honey or stevia (note: shelf life may decrease).
- Relish thickens as it cools. Don’t rush the simmering process.
- Once opened, keep in the fridge and use within 2–3 weeks.
- This recipe can be frozen in airtight containers for up to 6 months.
Nutrition Information:
Yield: 4 Serving Size: 1 tablespoonAmount Per Serving: Calories: 25Carbohydrates: 6gProtein: 0.3g
Nutrition is estimated and will vary based on specific ingredients used.
Final Thoughts: Why This Tomato Relish Recipe Is Always on My Shelf
If you’ve made it this far—thank you! I hope I’ve convinced you that making your own tomato relish is not only doable but incredibly rewarding.
This recipe has become a bit of a tradition in our house. It starts with a pile of ripe tomatoes on the kitchen bench and ends with rows of beautiful jars cooling by the window. Every batch has its own little personality, and that’s what I love most—no two are ever quite the same.
Whether you’re making it for BBQ season, giving it away as gifts, or just want something delicious to jazz up your weekday lunches, this tomato relish recipe is one you can always come back to. It’s simple, homemade, and full of heart—just the way food should be.
If you try it, I’d truly love to see your version! Tag me on Pinterest using #MyTomatoRelish or leave a comment below and tell me how you made it your own.
Until next time, happy preserving 💛