Easy Kiwi Mince and Cheese Pie – My Family’s Favorite Dinner
I’ve been making this mince and cheese pie since my uni days, and honestly—it’s never failed me. There’s just something so comforting about pulling a golden, flaky mince and cheese pie out of the oven and watching that cheesy filling bubble up. It’s the kind of meal that gets everyone around the table fast, no questions asked.
This is the mince and cheese pie my partner requests when he’s had a rough day. It’s the pie I bake in bulk and freeze for busy school nights. And it’s the one that’s guaranteed to disappear at any shared lunch.
In this post, I’ll walk you through exactly how I make my version of this classic Kiwi pie—step by step, with tips I’ve learned from trial (and a few soggy-bottom errors!). You don’t need fancy tools or complicated ingredients—just good mince, good cheese, and a bit of puff pastry magic.
What is a Mince and Cheese Pie?
A true New Zealand classic
If you grew up in New Zealand, chances are you’ve grabbed a warm mince and cheese pie from a bakery, petrol station, or school tuck shop at some point. It’s practically a rite of passage here. But when you make a mince and cheese pie at home? That’s when the magic really happens.
This iconic Kiwi dish is exactly what it sounds like: seasoned beef mince simmered in a rich gravy, tucked into a flaky puff pastry shell, and topped with melty cheese. A homemade mince and cheese pie is simple, hearty, and deeply satisfying. Unlike the UK’s mince pies—which are sweet and filled with dried fruit—our version is savoury to the core.
It’s the kind of food that brings people together. I’ve served mince and cheese pies at potlucks, made them as comfort food for friends, and packed mini versions for school lunches. There’s a reason this recipe has stuck around—it’s unfussy, filling, and always hits the spot.
Whether you’re craving nostalgia or just want something really tasty for dinner, this pie delivers every time.
Ingredients
Pantry-friendly and easy to find in NZ supermarkets
You don’t need anything fancy to make this mince and cheese pie—just a few everyday ingredients you probably already have at home. I like to sneak in a bit of grated carrot for sweetness (and to feel slightly virtuous), but feel free to skip it if you’re going for a classic mince and cheese pie the way grandma used to make.
Here’s what I use:
- 500g beef mince – I go for regular, not lean. The little bit of fat keeps it juicy.
- 1 small onion, finely chopped
- 2 garlic cloves, minced
- 1 grated carrot (optional, but adds subtle sweetness and moisture)
- 1 tablespoon Marmite (optional but highly recommended—it gives that classic savoury Kiwi edge)
- 2 tablespoons plain flour
- 1 tablespoon Worcestershire sauce
- 1 cup beef stock
- 1½ cups grated cheese – I usually use Tasty cheddar, but Edam or Colby work too
- 2 sheets frozen puff pastry, thawed
- 1 egg, beaten (for brushing the top)
Optional Add-ins:
- A handful of peas or chopped mushrooms
- Chilli flakes or a pinch of smoked paprika for extra flavour
- Fresh herbs like thyme or parsley
Pro tip: If you’re using Marmite, start with a small amount—it’s powerful stuff! You can always add more.
What’s the Best Cheese to Use?
Choosing the perfect melt
Let’s talk cheese—because it can truly make or break your mince and cheese pie. I’ve tested a few over the years, and Tasty cheddar always comes out on top. It melts beautifully, has a bold flavour that complements the mince, and gives you that iconic gooey stretch when you slice into the pie.
If you prefer something milder in your mince and cheese pie, Edam or Colby are great choices too. They still melt nicely but have a smoother, creamier flavour. Sometimes I mix half Tasty and half Edam for the best of both worlds.
Want to shake things up?
Try a blend with a hint of smoked cheese for extra depth, or throw in a touch of mozzarella if you’re after a super gooey filling.
Just avoid cheeses that go oily or separate when melted (like some aged cheddars)—they’ll give you a greasy top instead of a golden, bubbly one.
Equipment You’ll Need
No fancy gadgets—just the basics
One of the reasons I love this mince and cheese pie recipe is how low-effort it is when it comes to tools. If you’ve got a standard kitchen setup, you’re already sorted.
Here’s what I use:
- Large frying pan or skillet – for browning the mince and making the sauce
- Mixing spoon or spatula – wooden is my go-to
- Baking tray – flat or rimmed, depending on your pie size
- Pastry brush – for that glossy egg-washed top
- Sharp knife or kitchen scissors – for trimming pastry
- Rolling pin (optional) – useful if you’re resizing or shaping pastry
- Oven, preheated to 200°C (fan-forced)
Optional but fun: Individual pie tins if you’re making mini pies—they’re great for school lunches or meal prep!
No stand mixers, food processors, or pastry cutters needed here—just real food, real tools, and real flavour.
Step-by-Step: How I Make Mince and Cheese Pie
You can totally do this
This isn’t one of those recipes where you need to be a pastry chef. I’ve broken it down into simple steps that I follow every time—and if I can do it after a long day, so can you.
1. Sauté the aromatics
Start by heating a splash of oil in a frying pan over medium heat. Add the chopped onion, garlic, and grated carrot (if using), and cook for about 3–4 minutes until softened and fragrant. This is your flavour base—don’t rush it.
2. Brown the mince
Add the beef mince and break it up with your spoon. Cook until it’s nicely browned and there’s no pink left—this part is key for getting that rich, beefy flavour. Drain off any excess fat if needed.
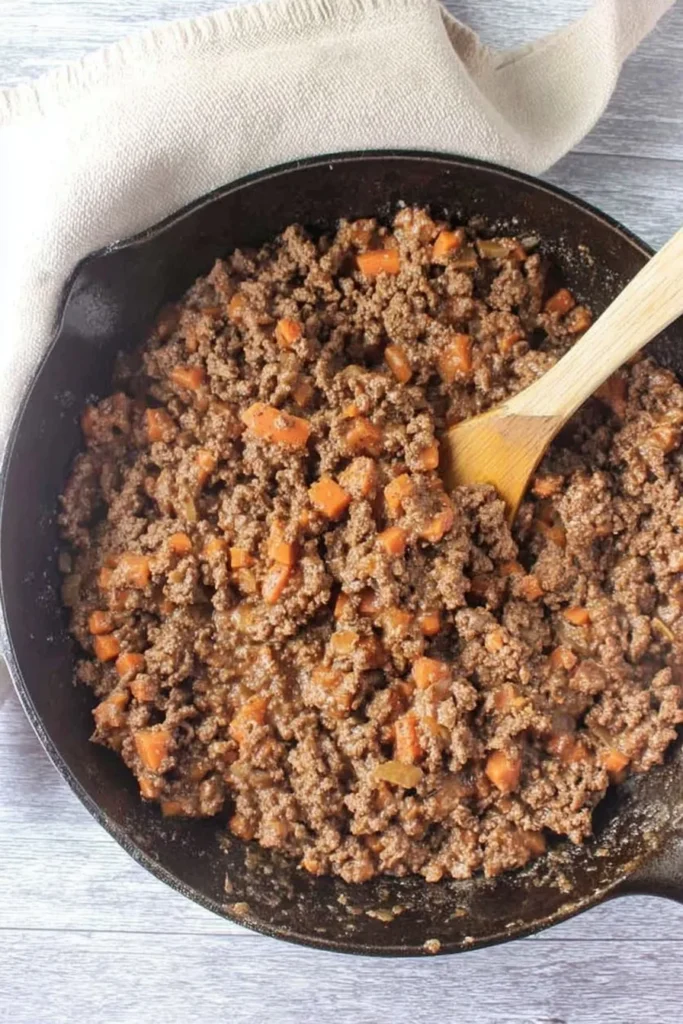
3. Build the sauce
Sprinkle in the flour and stir it through to coat the mince—it helps thicken everything up. Then stir in the Marmite (go easy at first), Worcestershire sauce, and beef stock. Let it bubble gently for 5–7 minutes until the mixture thickens and turns glossy.
Tip: If it’s too thick, add a splash of water. If it’s too runny, simmer a bit longer.
4. Cool the filling
Remove the pan from heat and let the mixture cool for at least 15–20 minutes. I usually transfer it to a bowl and pop it in the fridge while I prep the pastry. Trust me—this step prevents soggy bottoms.
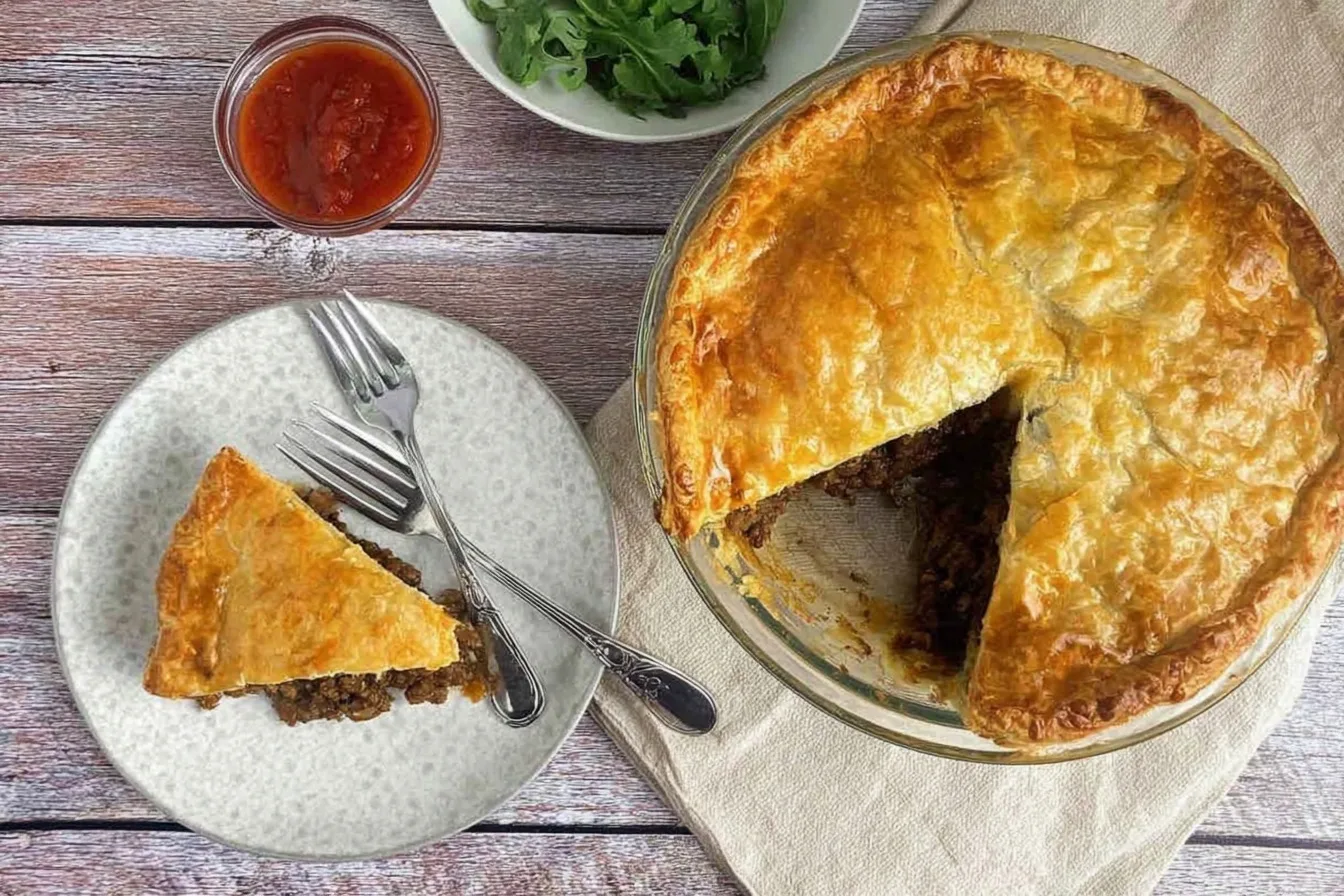
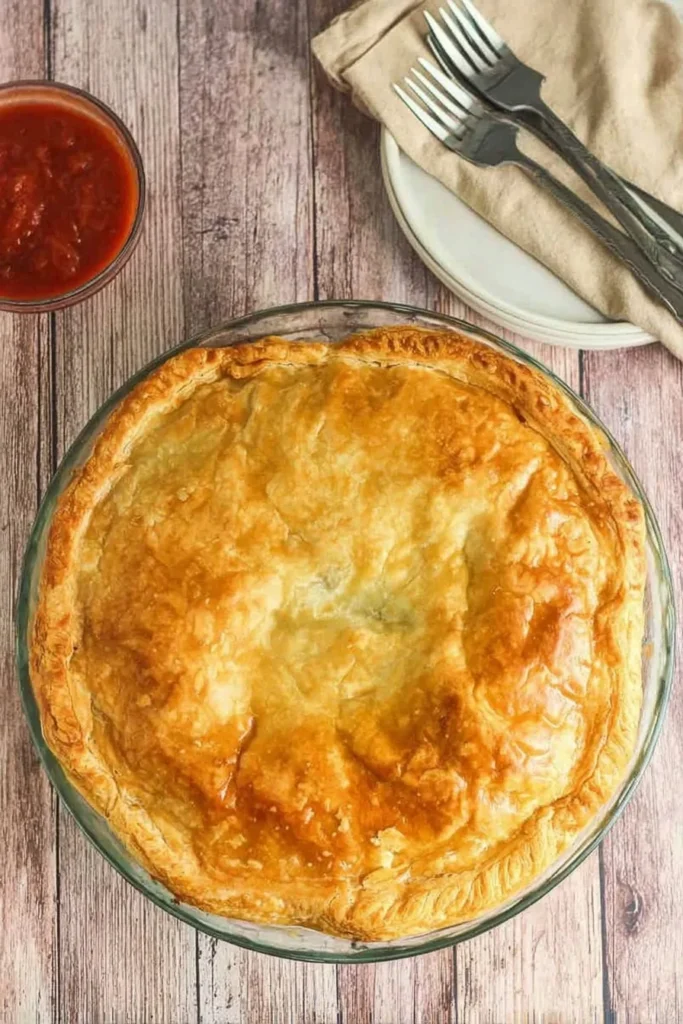
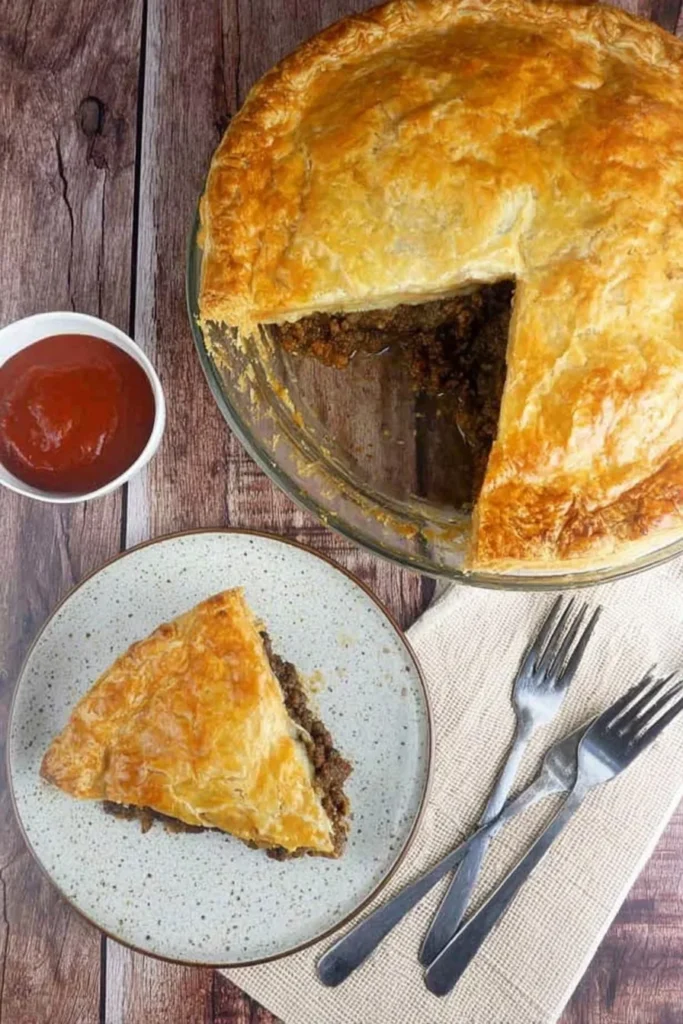
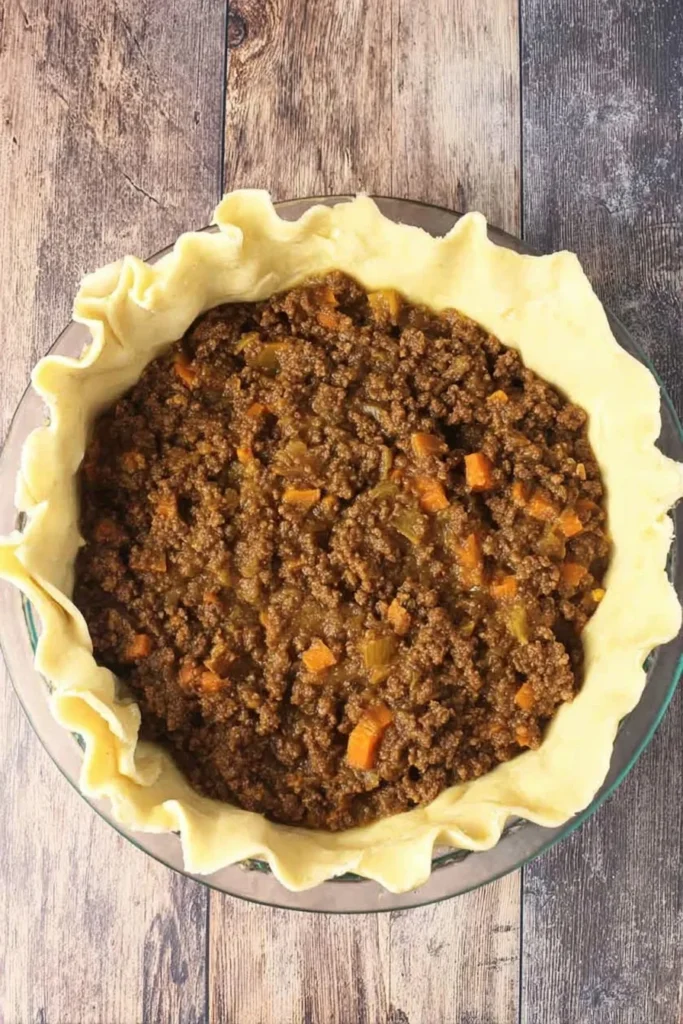
5. Assemble the pie
Lay out a sheet of puff pastry on a lined baking tray or gently press it into a pie tin. Spoon in the cooled mince mixture and spread it evenly. Scatter the grated cheese generously over the top—don’t hold back!
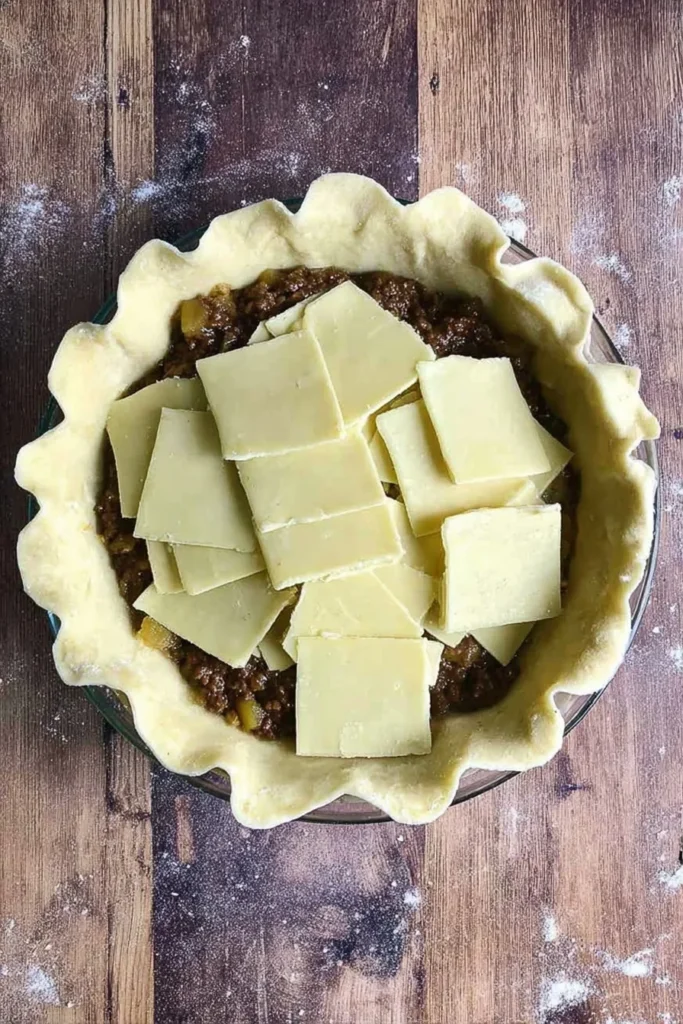
Cover with another sheet of pastry. Press and crimp the edges with a fork to seal. Use a knife to cut a small steam hole in the centre.
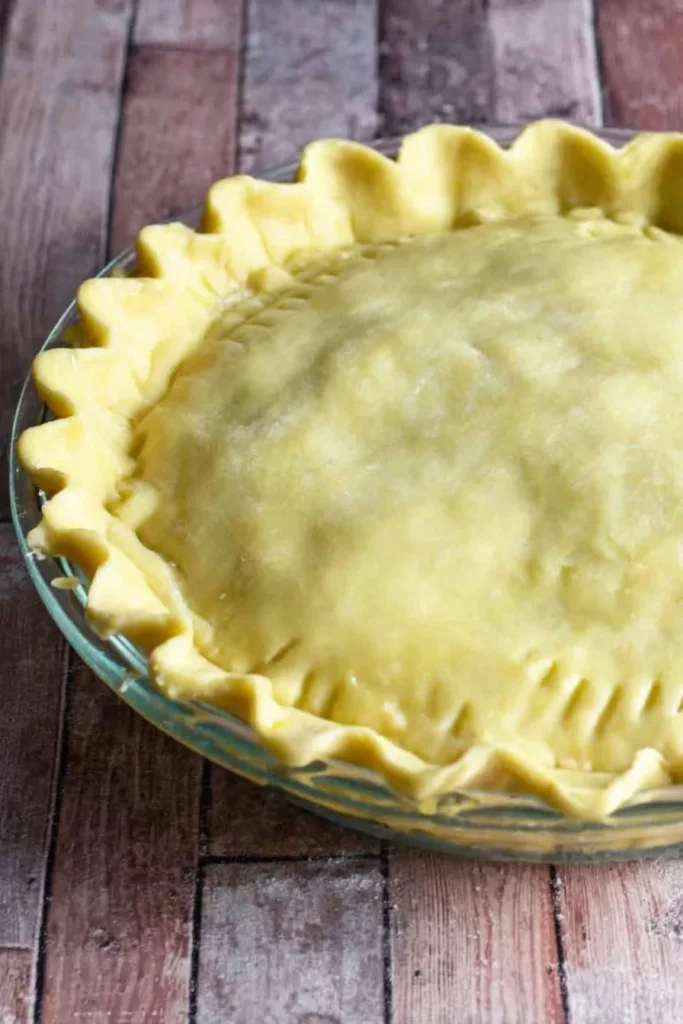
6. Egg wash and bake
Brush the top with beaten egg—this gives you that golden finish. Bake in the preheated oven (200°C) for 25–30 minutes or until the top is puffed and golden brown.
Optional: Sprinkle a little extra cheese on top halfway through baking if you want an extra cheesy crust.
Once baked, let the pie rest for 5–10 minutes before slicing. The filling will firm up slightly, making it easier to serve without everything spilling out.
Want a crispy side to go with your pie? These golden, air-fried chicken strips are ready in minutes and make the perfect savoury contrast. Here’s how I make them.
Variations and Add-Ins
Make it your own!
Once you’ve nailed the classic mince and cheese pie, it’s fun to start playing around. I’ve tried a bunch of different twists over the years—some by accident, some by request from picky eaters—and these are the ones that actually work.
Add more veg
- Stir in a handful of peas, corn, or finely chopped mushrooms with the mince.
- Add baby spinach at the end of cooking—it wilts in seconds.
Try different proteins
- Lamb mince makes for a richer, slightly sweeter pie.
- Turkey mince is a lighter option that still holds flavour well.
- For a vegetarian version, go with lentils + mushrooms + veggie stock, and swap to a good-quality vegan cheese.
Add some heat
- A pinch of chilli flakes or smoked paprika in the sauce adds depth.
- For a smoky kick, try adding a touch of chipotle paste.
Make mini pies
- Use muffin tins or ramekins for single-serve pies.
- Great for lunchboxes, parties, or meal prepping!
These freeze beautifully too—just wrap and freeze after assembling, and bake from frozen when needed.
Storage, Freezing & Reheating Tips
Make-ahead friendly and freezer-approved
One of the best things about this mince and cheese pie is how incredibly freezer-friendly it is—which means you can batch-make it and always have a comforting dinner ready to go.
Fridge
- Store leftover cooked pie in an airtight container in the fridge.
- It’ll stay fresh for 3–4 days.
- Reheat slices in the oven for best results (180°C for 10–12 minutes).
Freezer
- I usually assemble the pie but don’t bake it, then freeze it raw.
- Wrap tightly in cling film and foil or place in a freezer-safe container.
- Bake straight from frozen at 200°C, adding an extra 10–15 minutes to the usual cooking time.
Tip: If freezing leftovers that are already cooked, slice them first so they reheat evenly.
Reheating tips
- Oven is best for a crisp pastry.
- Avoid the microwave unless you don’t mind a soft crust.
- To prevent burning, cover with foil for the first half of reheating.
Nutrition Information
(Per serving – based on 1/8 of a full pie)
While this mince and cheese pie is definitely in the comfort food category, it’s also full of real ingredients and quite satisfying—meaning a single slice goes a long way.
Here’s an approximate nutritional breakdown for one serving:
| Nutrient | Amount |
|---|---|
| Calories | 420 kcal |
| Protein | 18g |
| Total Fat | 25g |
| Saturated Fat | 11g |
| Carbohydrates | 28g |
| Sugars | 2g |
| Fibre | 2g |
| Sodium | 670mg |
Note: Nutrition estimates are based on standard ingredients. For a detailed macronutrient breakdown and serving size calculator, visit Fitia’s mince and cheese pie profile.
If you’re making swaps (like turkey mince or vegan cheese), you can reduce the fat and sodium. I sometimes sneak in extra veg or go half-and-half with lean mince to lighten it up a bit—without losing flavour.
Printable Recipe
Kiwi Mince and Cheese Pie

This classic Kiwi mince and cheese pie is the ultimate comfort food—packed with savoury beef mince, melty cheese, and wrapped in golden flaky pastry. A family favourite you can bake, freeze, and reheat any time!
Ingredients
- 500g beef mince
- 1 small onion, finely chopped
- 2 garlic cloves, minced
- 1 carrot, grated (optional)
- 1 tbsp Marmite (optional but adds umami flavour)
- 2 tbsp plain flour
- 1 tbsp Worcestershire sauce
- 1 cup beef stock
- 1½ cups grated Tasty cheddar (or Edam/Colby)
- 2 sheets puff pastry, thawed
- 1 egg, beaten (for brushing)
Instructions
1. Preheat your oven to 200°C (fan-forced).
2. Heat oil in a pan and sauté onion, garlic, and grated carrot until soft.
3. Add beef mince and cook until browned.
4. Stir in Marmite, flour, and Worcestershire sauce.
5. Pour in beef stock and simmer for 5–7 minutes until thickened.
6. Remove from heat and let the mixture cool for 15–20 minutes.
7. Line a pie dish or tray with one sheet of pastry.
8. Add the cooled mince mixture and sprinkle cheese on top.
9. Cover with the second pastry sheet, seal edges, and cut a steam hole.
10. Brush with beaten egg and bake for 25–30 minutes until golden and puffed.
11. Rest 5 minutes before slicing. Enjoy!
Notes
- Make it vegetarian with mushrooms, lentils, and veggie stock.
- Use shortcrust pastry on the bottom for a sturdier base.
- Freeze unbaked pies for up to 2 months—bake from frozen.
- Reheat leftovers in the oven for best results.
Nutrition Information:
Yield: 8 Serving Size: 1Amount Per Serving: Calories: 420Total Fat: 25gCarbohydrates: 28gProtein: 18g
Nutritional information is an estimate only and has been calculated using an online tool. Values may vary depending on specific ingredients used, brands, and portion sizes. For medical or dietary advice, please consult a qualified professional.
Frequently Asked Questions
Can I freeze these pies?
Yes—absolutely! I freeze mine unbaked all the time. Just assemble as usual, wrap it tightly, and pop it in the freezer. When you’re ready to bake, put it straight into a preheated oven at 200°C and add an extra 10–15 minutes to the bake time. You’ll still get that golden, puffed-up crust.
What’s the best cheese for melting?
I always reach for Tasty cheddar—it’s bold, melts beautifully, and holds its shape inside the pie. If you want something creamier, Colby or Edam are great options too. Want super gooey? Add a bit of mozzarella into the mix.
How do I stop the bottom going soggy?
Here’s what works for me every time:
Let the filling cool completely before assembling.
Use a hot oven (200°C or fan-forced).
Bake the pie on the lowest oven rack, so the base crisps up nicely.
You can also preheat your tray or place the pie tin on a preheated pizza stone if you’re really serious about crunch!
Can I make it vegetarian?
Yes! Try this combo:
Sautéed mushrooms, brown lentils, grated carrot, and veggie stock.
Use plant-based cheese (I like Angel Food in NZ).
Keep the Marmite—it still gives a savoury boost.
Can I use shortcrust pastry instead of puff?
Definitely. Shortcrust makes a sturdier base and is great if you’re planning to transport the pie (picnic, anyone?). I sometimes do puff on top and shortcrust on the bottom for the best of both worlds.
That’s a Wrap on My Kiwi Mince and Cheese Pie
And that’s how I make my trusty mince and cheese pie—the same way I’ve done it for years in my little Kiwi kitchen. This mince and cheese pie is humble, hearty, and always hits the spot. Whether I’m cooking it for a family dinner, freezing a batch for a busy week, or whipping up mini versions for lunchboxes, it’s a recipe that never lets me down.
If you give this mince and cheese pie a go, I’d love to hear how it turns out. Did you try a new cheese blend? Add mushrooms or make it vegetarian? Drop a comment below or tag me on Pinterest—I honestly get so excited seeing how others make this classic their own.
Thanks for baking with me ❤️